We’ve seen thousands of perfectly good backpacks tossed in the trash over torn straps – a crime against both wallets and common sense. Let’s fix that. Whether you’re dealing with a frayed connection point or a complete strap failure, we’ll show you proven repair techniques that work on any pack. From quick fixes to bomb-proof solutions, we’ve got methods that’ll save your gear and your cash. Time to resurrect that trusty backpack.
Essential Tools and Materials Needed
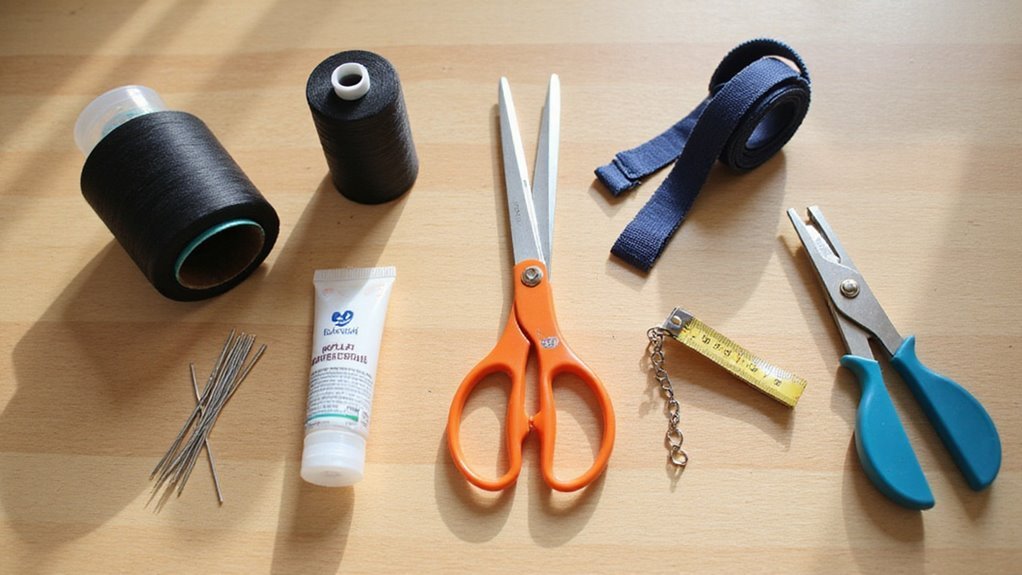
Before you plunge into fixing that torn backpack strap, we’ll need to gather the right tools and materials for a proper repair.
Let’s start with 0.7 yards of upholstery nylon thread – it’s tough enough for the job.
Grab a sturdy needle that can handle thick fabrics without bending or breaking. You’ll need sharp scissors for clean cuts and trimming frayed edges.
For reinforcement, get 2×5 nylon cloth or webbing as patching materials. Additionally, having a sewing kit ready will ensure you have everything you need for a successful repair.
Clear your workspace – you’ll want enough room to spread everything out where you can reach it easily.
Assessing the Damage to Your Strap
Once you’ve gathered your repair materials, it’s time for a thorough damage assessment of your backpack strap.
We’ll need to systematically evaluate the condition to determine the best repair approach.
1. Examine the strap’s surface for visible tears and frayed edges – these are your primary damage indicators.
Pay special attention to seams where stress points commonly occur.
2. Test the strap’s structural integrity by gently flexing it.
Look for weak spots or thinning areas that could compromise functionality.
3. Check all hardware attachments, including buckles and adjusters.
A compromised connection point can turn a simple fix into a major repair job.
Preparing the Workspace and Backpack

After identifying the extent of damage, let’s get your workspace ready for a proper backpack repair.
First, clear a well-lit area with enough room to maneuver your backpack. Gather your essential tools: needle, thread, scissors, and patching fabric – interruptions kill momentum.
Now, let’s prep the backpack. Inspect those straps thoroughly – might as well fix everything while we’re at it.
Clean off any dirt or debris that could mess with your repair work. Finally, trim those frayed edges around the damaged area. We need a clean surface to work with, not a stringy mess.
Understanding Different Repair Techniques
While most folks reach straight for needle and thread, there’s a whole arsenal of repair techniques at your disposal.
Let’s break down your options for fixing that torn strap based on damage severity and your skill level:
- Basic hand-sewing with backstitching works perfectly for minor tears – it’s simple yet effective for most repairs.
- For serious damage, reinforce with nylon patches or webbing across high-stress areas.
- When sewing isn’t practical, quality fabric adhesives can work wonders – just follow instructions precisely.
Choose your technique wisely. Regular cleaning of your backpack straps can also help prevent future tears and prolong their lifespan.
We’ll always recommend proper stitching over quick fixes, but sometimes you need options.
Remember: matching the repair technique to your skill level guarantees lasting results.
Basic Stitching and Sewing Methods
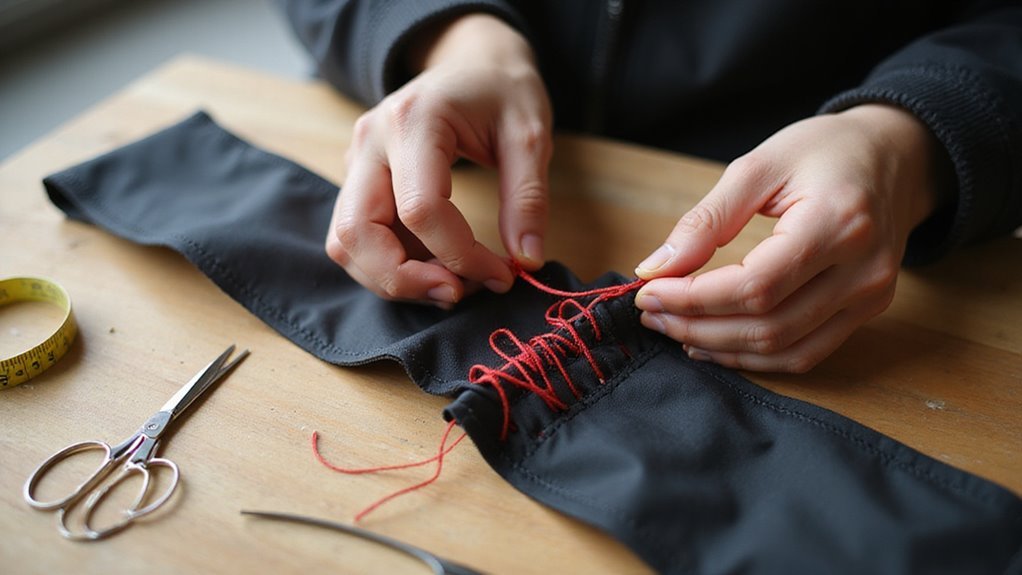
Let’s dive straight into the backbone of backpack repair: basic stitching.
When repairing a shoulder strap, the backstitch is your best friend. We’ll insert our needle through both fabric layers, creating overlapping stitches that won’t quit under pressure.
Don’t skimp on materials – grab a heavy-duty needle and robust nylon thread. For minor tears, a running stitch might do the trick, but we’re not taking chances with straps.
They’re load-bearing champions that demand the backstitch’s superior strength. Keep those stitches tight but don’t pucker the fabric. Remember to maintain proper weight distribution to prevent future strain on your backpack.
Check your repairs regularly – prevention beats cure every time.
Reinforcing the Repaired Area
Basic stitching alone won’t cut it for a lasting strap repair – we’re going straight for the reinforcement phase.
Let’s bulletproof that repair with strategic reinforcing that’ll laugh in the face of wear and tear.
- Cut a piece of durable nylon fabric slightly larger than the repaired area and secure it with strong adhesive or additional stitching.
- Add a second layer of heavy-duty thread stitching around the patch edges – this is your insurance policy against future failures.
- Make periodic inspections of your handiwork, checking for loose threads or emerging weak spots that need attention.
Testing the Repaired Strap’s Strength

Now that you’ve done the repair work, it’s time for the moment of truth – testing that strap’s strength before trusting it with your gear.
Let’s verify the repair’s integrity systematically. Start by gently pulling the strap with steady pressure, checking for any loose stitching or separation.
Watch for slippage around buckles and seams – they’ll tell you if something’s not right. Inspect every inch of your handiwork for gaps or trailing threads.
Finally, let’s do a weight test. Gradually load up your pack while monitoring the strap’s performance.
After testing, give everything one last thorough inspection before declaring victory.
Preventive Measures for Future Damage
While fixing a torn strap solves your immediate problem, preventing future damage requires a systematic maintenance approach.
Let’s make your backpack last with these critical steps:
- Regularly inspect straps for signs of wear – catch fraying early and you’ll avoid catastrophic failures when you least expect them.
- Never exceed the manufacturer’s weight limit, and always store properly (that means no cramming under heavy objects).
- Apply fabric protector after cleaning to create a protective barrier against moisture and dirt. Additionally, ensure good airflow in the storage area to prevent moisture buildup and mold.
We’re not just fixing straps here – we’re building a maintenance routine that’ll prevent damage and save you money.
Alternative Repair Solutions

Smart strap repair isn’t limited to needle and thread. When dealing with heavy loads, we’ve got alternative solutions that’ll keep your outdoor gear intact.
| Method | Best For |
|---|---|
| Adhesive Solutions | Small tears |
| Durable Fabric Patch | Large rips |
| Webbing Reinforcement | Weight-bearing areas |
| Paracord Fix | Emergency repairs |
| Heavy-Duty Glue | Non-sewable materials |
These alternatives work brilliantly when traditional stitching isn’t feasible. Patching with reinforced materials creates a bombproof repair that’ll outlast standard fixes. Remember: matching the repair method to the damage type is essential. Additionally, using protective sprays can help prevent future damage to your straps. No need to overthink it – sometimes the simplest solution packs the most punch.
Advanced Repair Tips and Tricks
Let’s plunge into the advanced techniques that’ll transform your strap repairs from basic fixes to bombproof solutions.
When tackling serious backpack repair, three pro-level moves make all the difference:
- Use heavy-duty nylon thread with a robust needle – don’t skimp here, your straps depend on it.
- Master the backstitch technique for maximum durability, especially around frayed edges that need extra support.
- Add bar-tacking reinforcement at stress points – this rapid-fire stitching creates bulletproof anchor points.
Always test your repairs by gradually loading weight. Trust us – this extra step prevents mid-hike disasters. Additionally, make sure to regularly inspect your backpack for wear and tear to catch any potential issues before they become major problems.
Frequently Asked Questions
How to Fix a Ripping Backpack Strap?
Don’t let that ripping strap ruin our day! We’ll grab our needle and nylon thread, align the tear, apply a reinforcement patch, and use strong backstitching to secure everything together.
What to Do if a Bag Strap Breaks?
We’ll need to assess the break, gather DIY repair materials, and use proper sewing techniques. For emergency fixes, try paracord, or consider complete strap replacement if damage is severe.
Can Tailors Fix Backpack Straps?
Like skilled surgeons of fabric, tailors can definitely repair our backpack straps. We’ll find they offer expert repair techniques, handle various fabric types, and provide custom solutions at reasonable cost estimates.
How to Fix Fraying Straps?
Let’s trim the frayed edges first, then reinforce them with strong nylon thread using a backstitch. Adding a fabric patch provides extra durability. Regular maintenance helps prevent future fraying issues.